Also this is a skinning tutorial NOT a PhotoShop or PaintShop tutorial. I will give you suggestions and basics, but you will have to educate yourself on the graphics program you use.
Furthermore I there is a printer friendly version of this tutorial, it has a lot of graphics and may take some time to load (and print) but I tend to work off printed materials better than on screen. This way I can help folks like myself as well as the gifted few who prefer to read right off the screen.
Last but not least, before you send me email with questions be sure you have read this document thoroughly. If you can't take the time to read it, why should I take the time to answer your question? I don't want to scare you off from asking questions, if you have them ASK, but I'm teaching you to fish NOT feeding you.
Getting Started
Okay, the hardest part of a journey is the first step. Skinning for the LithTech engine will be no different. If you have Primal Hunt, you should have most of the stuff you will need but I will assume you do not for the sake of the lowest common denominator. The skills apply to both but the extraction of the files is different.
You need the following:
- AvP2 Retail Version patched up to the latest version
- PhotoShop 5.5 or higher or PaintShop Pro (the later is Free to Try)
- Aliens vs. Predator 2 Toolkit Update
If you have PH, then the ToolKit will be on your pH disk as well as the updates for the toolkit.
STEP 1: Install and patch up AvP2.
STEP 2: Install the toolkit. This should create a directory under you <game path> called tools. <game path>\tools These tools are a collection of tools that you will use to skin. The ones we will use are Lithrez & Dedit. I will walk you through each as we go as they can get confusing. ModelEdit is also a cool tool but I think I'll leave that for Advanced users at this point.
STEP 3: This step isn't going to make a whole hell of a lot of sense right now but you will love me later. You want to make a shortcut to your command prompt on your desktop. Basically find the command prompt icon in your windows applications menu and right click on it. In the menu that pops up, go to "Send to" and then "Desktop (create shortcut)".
STEP 4: Go to the Desktop and find your newly created icon. Right click on it and from the menu select properties. You will get a menu that looks like this:

Change the "Start in" line from %HOMEDRIVE%%HOMEPATH% to <game path>\tools (Don't make me come to your house and slap you by actually typing "<game path>" Type in the path to your installation of AvP2 in it's place. Last time I will mention this). And then hit "Apply".
STEP 5: Okay, now I want you to double click our newly modified Command Prompt icon. This should open a DOS window in your <game path>\tools directory
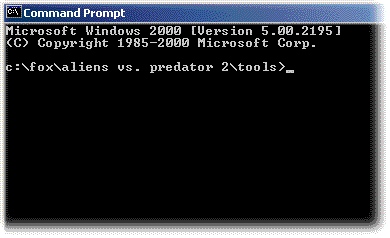
Type "unrez.bat" and hit "Enter" This is going to take a while, so sit back and wait.
This will extract all the AvP2 files in the game's compressed "rez" files. You will become intimate with the rez concept later, and that is when you will see the benefits of setting up this command prompt shortcut. Technically you are in the process of using the LithRez program for the first time, but the folks Monolith have basically created a batch file to do the command line work for you. DON'T WORRY, I'll walk you though it later when I talk more about LithRez.
When unrez.bat is complete you will see "Unrez complete." on your screen.
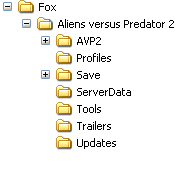
So what the hell did this unraz.bat do? Well if you look in your <game path> directory you will now see a folder called "AvP2". In that folder is EVERY resource the game uncompressed:
DON'T MESS WITH ANYTHING IN HERE YET! Go to the next step.
STEP 6: We are getting close to doing some real skinning here, but first you need to install your graphics program of choice. Again I prefer PhotoShop 6 but it ain't cheap! Paint Shop Pro is a GREAT program and honestly you could probably use it forever without registering it (making it free), but that's an ethics issue and I won't bring it up here other that to say I think it's worth registering.
Preparing To Begin Skinning
Thought we would be working on graphics on this page didn't you? Sorry we still have some house keeping to do. Like the previous page you will only have to do this once, but it will make a world of difference. (Please note I have Primal Hunt so this may be a bit different than your AvP2 version, but the directories that concern us are the same)
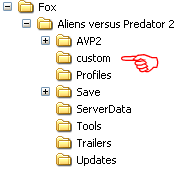
This part of the tutorial requires some heavy explaining, mainly so you can wrap your mind around how LithTech works with models and skins. First however we need to add some folders to your computer so we are all on the same page. Open Windows Explorer or My Computer and go to the <game path> folder. Create a new folder called "custom". When that's done you should have <game path>\custom we'll need this later, just do it and forget it for now.
Now go to your C drive and create a folder called "avp2work" i.e. c:\avp2work
This folder will be where all of your pre-rez work will happen and this leads us to the most conceptually complicated part of this whole operation.
 What LithTech Expects
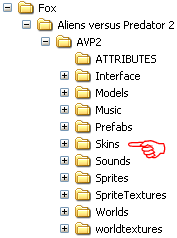
Ok remember when we ran the unrez.bat? It created the AvP2 directory under our <game path> as seen on the right. As skinners we are only concerned with the "Skins" directory. This is where every skin for every model in the game exists, from character to weapons to floors, ceilings, caves, etc.
So as you can imagine there is a hell of a lot of stuff in this folder in a very specific order. This directory structure is the order things HAVE to be in in order to LithTech to find what it needs and it is the directory structure you will have to emulate to make your skins override the in game skins.
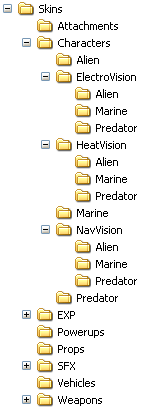 To the left you will see the skins directory I am pointing to above in an expanded mode. I have also expanded the "Characters" directory and sub-directories. These folders are where all the skins for all the characters live.
They exist in a special .dtx format (an output of Dedit...we'll get there). Note the directory structure. Before you jump ahead and try to open them in your graphics editing program I can save you the trouble and tell you it won't work. PATIENCE!
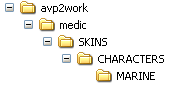
In this tutorial we will (eventually) edit the Harrison skin, which will be found in the <game path>\avp2\skins\characters\marine folder. In preparation of this work we need to setup the proper directory structure under our recently c:\avp2work.
Okay so let's pick a name for our project...We'll call it "medic". So first we need to create a folder called "medic" under "avp2work" and then all the folders FROM the avp2 directory above. In other words we need to create a directory structure like this:
c:\avp2work\medic\skins\characters\marine
Be careful with the plurals and singulars when setting these up. Watch the hierarchy! It makes a difference. Caps and Lower Case do not matter as I have demonstrate above.
Hang in there, I know this is confusing. It's the worst part of skinning for AvP2 but it will make sense in the end I promise. Once you have all this setup we can begin to actually do some work.
DEDIT and You!
Okay we have all the pieces in place to begin the creative work of making Harrison a medic...Errrr almost. Enter DEDIT! Okay I can't remember if the tools create shortcuts for Dedit and Model edit or not, but the programs can be found in the <game path>\tools directory.
Start up DEDIT. This program goes well beyond what we are about ot use it for. You can build entire levels with this tool (that's a whole other tutorial that I won't be writing). For our purposes however, you can think of DEDIT as a conversion tool. It turns .dtx files into editable .tga files and .tga files into AvP2 useable .dtx files.
First however we have to do one last piece of setup:
STEP 1: Click "file" and then "new project". This will popup a window asking for a Project Directory. Change this to c:\avp2work\temp and click "OK".
STEP 2: DEDIT will give you an error "Can't find class module object.dll"...just click OK, we don't need it.
STEP 3: Then it will ask "create new world?" click YES and type "avp2" and hit "ENTER"
Congrats, you have setup a place to import to and export from. Here is what your c:\avp2work will now look like:
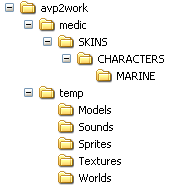
You will be seeing this later but for now just know it's there. CLOSE DEDIT.
Importing dtx and outputting tga
Now we get down to the real skinning.
STEP 1: From the <game path>\avp2\skins\characters\marine folder COPY the following files to the c:\avp2work\temp\textures directory:

STEP 2: Open DEDIT, and click on "file". At the bottom of the file menu you will see the project we opened last time...c:\avp2work\temp\temp.dep click on it.
STEP 3: Click on the texture tab in DEDIT and then the textures folder under it. You should see the following:
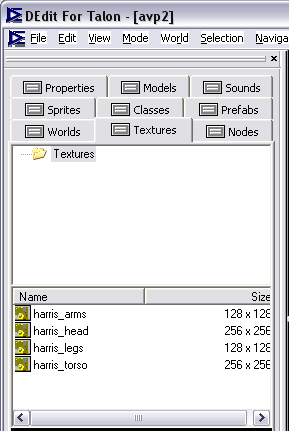
STEP 4: Highlight the 4 skins by clicking on the first one and then holding shift and clicking on the last one.
STEP 5: RIGHT click on the selected files and select "Export TGA File(s)" and click YES when it questions you about exporting them all.

STEP 6: Now you have something you can work with! Go to your c:\avp2work\temp\textures directory and you should have the following files:

Close DEDIT and then open the TGA versions of the skins in your editing program.
Photo/Print Shop is my friend!
Okay you should have all 4 of the Harrison skins open in Photoshop or Paint Shop. It is important to know that even if we only play to put a logo on the chest plate (harris_torso.tga) we still need to make sure we have all 4 Harris skins or when we rez it up later it won't work in the game.
Okay we are going to do something obvious but super easy so you get the idea. You could spend days getting your skin just right but this should only take you 5 min. Make your Harris_torso look like this:
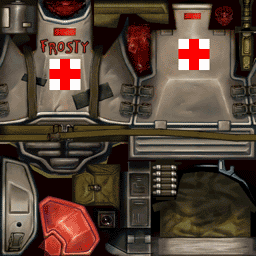
Save it as a TGA in the same place we opened it from with the same name. Basically over write the old Harris_torso.tga with this one.
DEDIT Again!
Now we need to put the new TGA back into the format that AvP2 can understand.
STEP 1: Open DEDIT, and click on "file". At the bottom of the file menu you will see the project we opened last time...c:\avp2work\temp\temp.dep click on it.
STEP 2: Click on the texture tab in DEDIT and then the textures folder under it.
STEP 3: Right click on the lower portion of the screen again, but this time select "Import TGA Files".
STEP 4: Since we only modified the Harris_torso.tga we only need to import that one. Double click that file and then DEDIT will warn you that the texture already exists. Click "Yes" to overwrite it. You'll now see two Harris_torso files in the lower DEDIT window...this is a bug...the lowest one in the list is the last one imported.
CLOSE DEDIT
Intro to Lithrez!
Now it's time to get ready to rez up your new skin and try it in the game. But as you guessed it's not a simple as that.
Lithrez is the compressing tool that creates rez files for the game. It's a command line tool so you need to do this in a DOS window and this is where you will thank me later for setting up the specialized command prompt shortcut.
STEP 1: MOVE the 4 harris dtx files from c:\avp2work\temp\textures to c:\avp2work\medic\skins\characters\marine
STEP 2: Double click on the Command Prompt icon we made, this will put you in the <game path>\tools directory
STEP 3: Type the following command:
lithrez cv medic.rez c:\avp2work\medic
I color coded it so you can see what the command does:
PINK is the programs name
BLUE is create
GREEN is view
GOLD is the name you want your rez file to be called
PURPLE is the path where the special directory structure and the files live
STEP 4: Hit "Enter"
STEP 5: Close the DOS window
Get On the Ready Line Marine!
Okay, we've done all the heavy lifting. MOVE the medic.rez file from <game path>\tools to <game path>\custom folder.
Here is what you need to do to get your skin to work in the game:
Installation:.
- Start up AvP2 and on the startup menu, click "options".
- Once in the options menu, click "Always Specify"
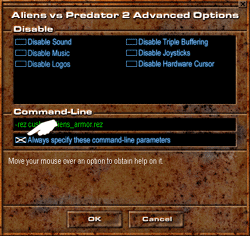
- Type in the command line as follows:
-rez custom\medic.rez
- Click OK.
- Click Play.
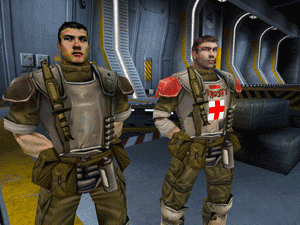
Once you start the game, select the single player Marine mission and select "Unwelcome Guests". You should see Frosty in his new Medic uniform in the beginning cut scene.
Final Thoughts
So there you have the basics of making skins. The real magic happens in your photo editing program. With some skill and/or practice you really are only limited by the model the skin is on.
Faces are the hardest to do in my opinion, but if you line up the eyes, mouth and nose you can usually pull something off that resembles what you were after.
You can also edit weapons skins, and the like, but remember you must create the exact directory structure in you project folder as it is in the <game path>\Avp2\skins\ directory and you need to retain the exact names.
Also you can do multiple skins per project. Most of my skin packs have 5 to 12 characters in them as well as 2 or 3 weapons. The forums are a great resource for skinning questions and there are a lot of skins out there to borrow ideas from.
To unrez someone else's rez:
- Create a folder under your c:\avp2work folder that makes sense (i.e. "phils_skins")
- Put their rez pack in your <game path>\tools directory
- Double click our custom Command Prompt shortcut
- type: lithrez x name_of_their_rez.rez c:\avp2work\phils_skins
- ENTER
You can then pull their DTX files into DEDIT and TGA them.

 About Phil "Mr Grizzly"