First thing you do, open up the AvP2.dep project.
I'm repeating this; first maps, are usually thrown away. (Well actually they are shelved, cause game makers never throw anything away). That's just a fact, mapping is not hard, but it is time consuming and if you haven't done it before, expect to make mistakes. Expect to make quite a few of them. It's not so much that they're shit, but rather, by the time you've finished your first map you will have learned so much that the second one would be considerably better, more efficiently built, and a better representation of your talent. And since a lot of people get into modding to develop a portofolio for entry into the gaming industry, you want the best possible releases associated with your name. And if you don't think that matters, and you don't give a damn about the quality of your product, rest assured no one else will.
I'm going to repeat some stuff here, cause you know some guys will have jumped forward and gone straight into making a level, not willing to learn the basics I've dealt with earlier. So they skipped the first few pages. It's human nature, it's the sound of inevitability rushing to meet us.
Starting with a simple box Level!
Start Up Dedit,
Then open up the avp2.dep project. You do not create a new project, you will merely be creating new worlds and levels in the existing AVP2 GAME project.
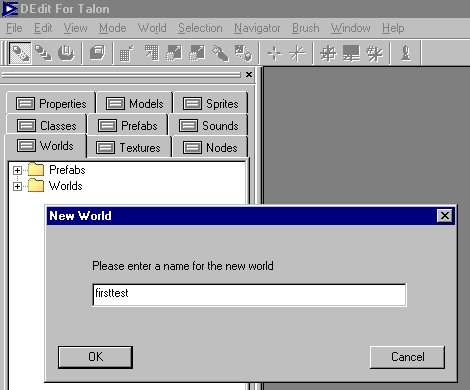
Now you make a new world by going to FILE and select new World. A dialogue box will pop up, give your new world a name, whatever you want, myfirstworld, testlevel, whatever, you can also open up firsttest. It will be saved in your Worlds folder in your Avp2/Worlds directory. It will also be saved as an .ed file. If you look at the screen above, among the nine tabs on the left is a WORLDS tab. Your first World will be saved in there. When you start up Dedit, you click on that tab to open the World you want to work on.
The main Dedit window has three areas, the TOOLBAR, the TABS and project window with the four Viewports on the right side of the screen. These will come to life when you open a world with four views. Your WYSIWYG 3D texture view, a 2D Topview floorplan, then a 2D Front view, and a 2D Side view, You can navigate around these views by pressing either the "o" and "i" on the keyboard while moving your mouse. "o" zooms in and OUT, "i" moves the view around. Move your mouse forward and back, and from left to right. Not much point in describing it. Just try it. They go in detail on this in the documentation that came with the tools, you can read more there, or check the earlier pages in the tutorials here.
Start by opening up the AvP2.dep project. You will be building custom levels in the the AvP2 project. You can open the "myfirstlevel" file.
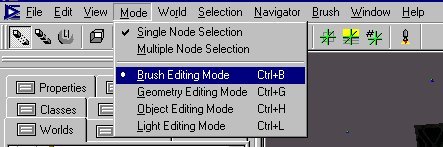
Make sure you are in Brush mode, ctrl-b or menu Brush Editing mode.
First thing to do is create a floor. You can either use the description in the docs that came with the tools or use the Brush Primitives in the toolbar. Or if you want just use the hollow function which I describe below. I'm going through it the long way because you actually learn mapping techniques in the long version. Dedit tools use similar cut and paste commands used in most Windows programs.
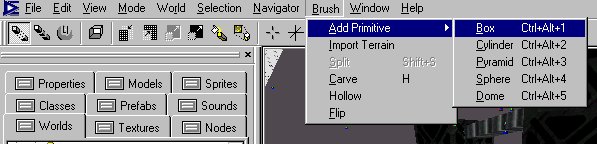
Ctrl-C is very useful as a copy function. Alright let's create the floor. Go BRUSH, Add Primitive, and choose BOX, set it at 512 and hit return.
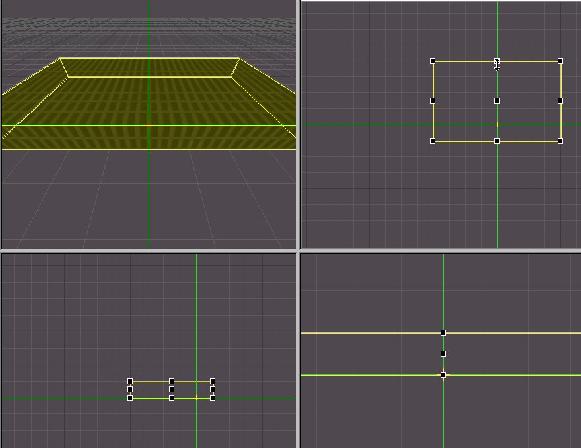
Move your cursor and expand the box in the top FLOORPLAN view, to like 512 x 512, easily delineated as the dark grey grid lines. and then shrink the thickness of the floor from the default 128 to 64 units which is the standard grid size we'll get into a habit of using.
While still selected, it's highlighted in yellow, CTRL-C and copy it. The copy will become our ceiling. Now if you paste it, an exact copy will be placed at the green MARKER, where as if you PASTE ALTERNATE (CTRL+ALT+V) it will be pasted directly in the same position as the original, and concurrently it will deselect the original and will highlight the exact copy.
The reason we're doing this is to make quick work of basic Brush construction. If you can conceptualize the look of any geometry, using copy and paste will make it be built faster. Now, using either the FRONT or SIDE 2D views, move the ceiling brush (the copy) upwards, approx. 640 units. Building on the standard grid of 64 units, helps with efficiency. A floor and a ceiling in TWO minutes. Move the mouse cursor to the grid at the top of the ceiling and press X. The MARKER should instanly be placed at this new point.
Now you'll create a wall Brush that butts against the ceiling, using the Spacebar, to mark a node at each of the four corners. Walls should be 64 units thick at a minimum, so it should look like a long rectangle. Dedit will now ask what thickness, but in this particular case its actually the height of the wall, so put in 512.
Instantly you will have a wall, from ceiling to floor. Copy it and Paste Alternate, then drag it to the opposite side. Two Walls, another 45 seconds. Now highlight either one of the walls, and then COPY and PASTE ALTERNATE. While still highlighted, go to the toolbar and hit MARKER TO SELECTION. Suddenly, the green MARKER is centered perfectly on that wall.
Now RIGHT CLICK. A menu will pop up. Amongst these is the option to rotate selection. CHOOSE IT. And pick 90 degrees. You now have your third wall. Using the floorplan view, move it so it butts against the floor and ceiling and the other two walls. If necessary resize the wall so it butts tightly against the other sides. One wall left, COPY, PASTE ALTERNATE, DRAG to its position.
Four minutes for the room. Now go to the NODE TREE. That can be found in the TABS SECTION. Click on it. You will see, a bunch of Brushes listed there. These are the Brushes you created. If you click the little box beside each you will see it light up on the grid. You can name these. Floor, ceiling, side, etc. Hold and drag the mouse across all the Brushes to select them all (You can also use the SHIFT KEY to select more than one brush at a time)
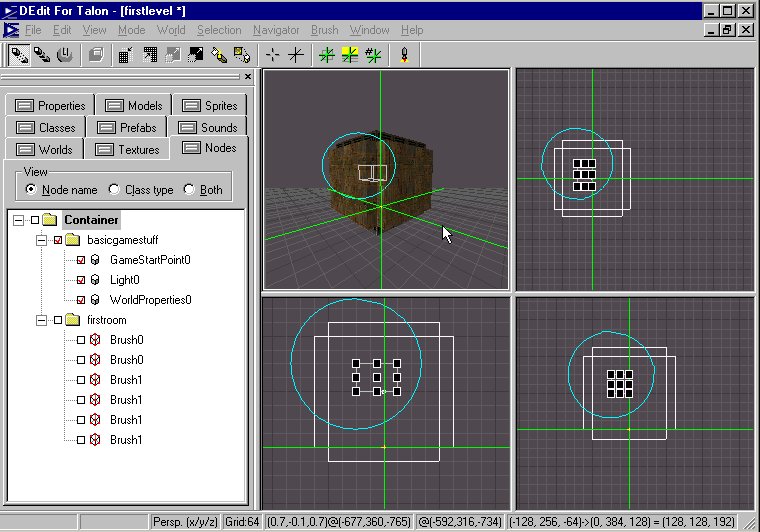
Go to the TOP menu and CLICK ON SELECTION, and you will notice that one of the options there is GROUP SELECTION. CLICK. Now check the node tree again. All of your Brushes have been placed inside a Folder (container). You can name this: FIRSTROOM. You probably won't name every Brush, but you should get in the habit of grouping and naming folders.
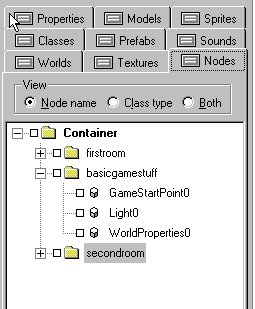
Now, COPY, PASTE ALTERNATE. You suddenly have another folder of Brushes created. It's also named Firstroom. Rename it to Second Room. In FLOORPLAN view, move the new selected Brushes so they just touch the first room outside to outside. You just made a second room in 14 seconds.
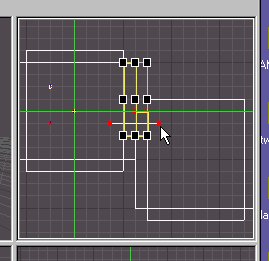
Now, I'm a firm believer you should never use CARVE as a function of Dedit, using SPLIT default "S" key, is much more controlable. So cut out a doorway between the two rooms using the SPLIT function. It's not complicated. Just make sure you don't have a leak. Make sure that all the Brushes butt up against each other. And do a visual inspection on the outside of your level in 3D view. Never carve a door, use split, which by default is the S key. Pick the wall Brush you want to split. Highlight it. Now using the cursor, make a line with two points that pass through the highlighted Brush where you want the Brush to be sliced through. TRY TO STAY ON THE GRID. Start the line where you want it, hit the space bar, a red dot appears. Drag your cursor, a white line will extend from that point, hit the space bar again. You will have a second red dot. now hit the "S" key, the Brush will now be split in two. Repeat the process for the other door jamb and the top header. You usually need a minimum of three or four splits to make an opening. The resulting piece can then be resized (thickness) and used for the door.
Three Necessary Objects
So what's left? Well, you want to get into your world to check it out. So you need a GAMESTARTPOINT Object. Move the GREEN MARKER to the center of the room, do it manually or, just select FirstRoom in the NODE tree, the MARKER TO SELECTION, and instantly the marker is in the center of the room. RIGHT CLICK,
SELECT Add OBJECT,
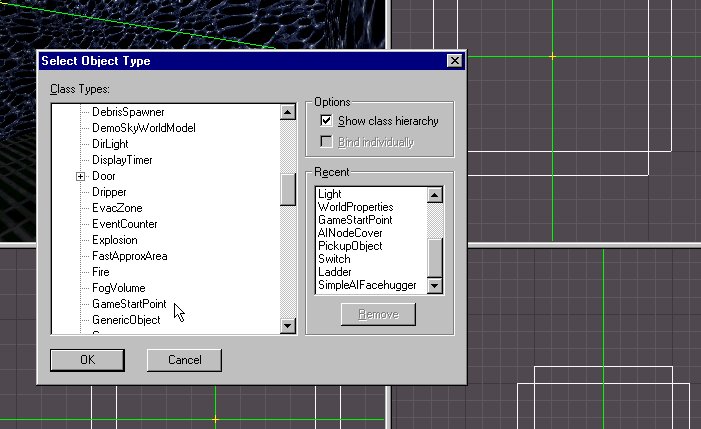
Scroll through the list and Pick GAMESTART. Then Right CLICK a second time, select Add Object and immediately place a WORLDPROPERTIES OBJECT at the exact same point.
There's one thing left.
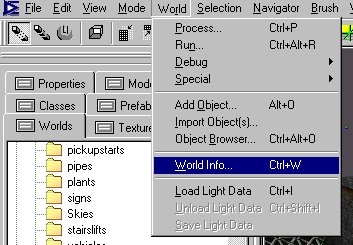
If you process now, the level will be pitchblack. You need some light. I discuss lights later on, but you can also increase the AMBIENT LIGHT of the entire level by a simple command line. GO TO the TOP MENUBAR, and select WORLD. Halfway down there is something called World Info, type this"
AmbientLight 10 15 20

You need the spaces. Each of the numbers represents a Red, Green, and Blue value. When they are equal they produce a shade of white light. Make two of them ZERO and see what happens.
All that's left now is to process your level.
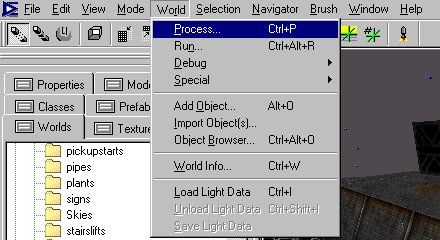
These are the default settings that work best for most mapping situations to start. Now, I have some additional commands in the extra Parameters field. You don't need them for your simple level, but if you by chance try to process one of the Sample SP maps like Alien or Marine, you'll need the -nosnapnocsg argument for it to work.
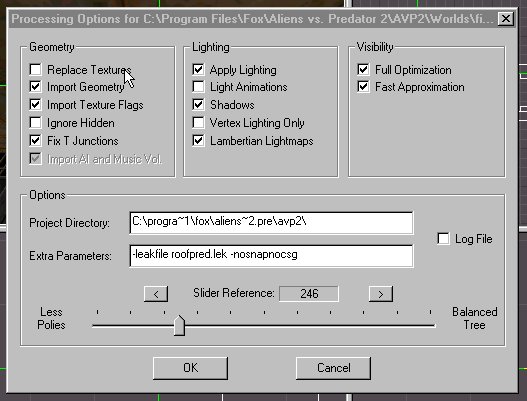
It should take 3-15 seconds depending on the speed of your machine.
Now RUN under the Worlds menu.
Your first level. If you made the opening big enough you should be able to continue into the second room. Congratulations. You are now officially a mapper. There should be a link to a basic room level in a zip file.
And here is a video version of this level tutorial, though the quality of the image is deteriorated to keep the file size down, it can still give you a real time idea of how the copy/paste and add object functions work in Dedit.