Each species has different underwater tolerances (air time).
Humans last about a minute, Preds 3 minutes and Aliens unlimited. Hence water represents a huge game balance potential. Unfortunately, due to time constraints or just purpose, Water interaction was not fully implemented in AvP2. Nonetheless you can create it fairly easily in Dedit. But there isn't animation for swimming, and getting out of the water, has a funny glitch in the code, which can be easily remedied with a small ramp.
In case it's not open already, Start by opening up the AvP2.dep project. You will be building custom levels in the AvP2 project. Open one of your existing levels.

You'll find out how to bind a WATER VOLUME object to square brushes to make them behave like water, then adjust the properties to make waves and color.
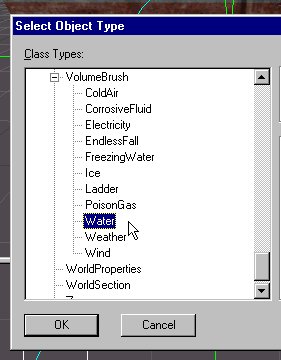
First thing create a brush. Something approx 640 x 1024 x 640. Use the cursor centering button so the cursor plants itself in the middle of the brush. Right click, on the pop up menu, go to ADD OBJECT SCROLL down thru the list to the VOLUME LIST, if its not expanded, click on the plus sign, in the expanded list you will see WATER: click to SELECT

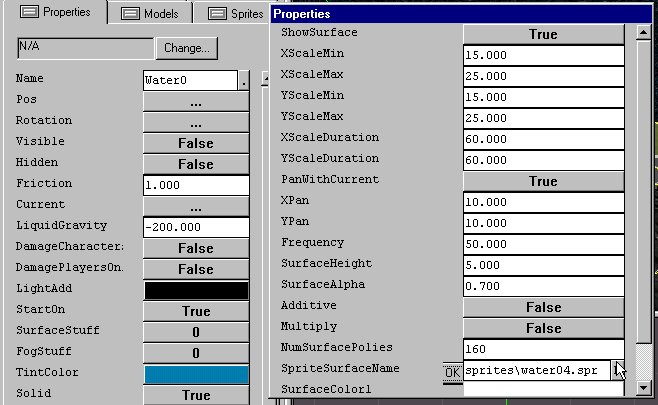
The object water, is now bound to the brush and in the centre of the brush. Click on the properties tab. There are various flags to adjust this water brush, including viscosity, surface colours , wave heights and colour of the liquid when you are underwater. Best to try these by trial and error, but the IMPORTANT ONE is SURFACE STUFF.
Under SURFACE STUFF, you'll get a pop up properties window, and what you want to focus on is SPRITESURFACENAME. you'll have a problem cause the water object defaults to a sprite for the surface that is not part of the AvP2 resources. The surface of water is actually a sprite, for some reason the default sprite target in AvP2 Dedit calls a sprite from NOLF. Use the browse function and find the water sprite in the AVP\SPRITE folder.

Sprite/Water04.spr gives a nice green water, quite appropriate for an alien planet. There are eight sprites for water available, and each gives an interesting variation. So you open up the surface stuff flag and near the bottom of the list, you'll see sprites, which will actually give you the transparent surface of water. Use the browse button to the water sprites. #4 was the one used in crashland.
Next decision. Wavy vs Flat Water:
Basically you can have two types of waters volumes: The Sprite wavy water described above or flat a surfaced water that has other advantages, and can work very well for Lava, and freezing Ice Water, and for Aquariums.
So what is the difference?
The Surface sprites water (which you designate in the surface stuff properties menu for the volume water object), merely renders the wavy top of the water, but the sides and bottom are invisible. If you're looking at it, you can see clearly through it till you step into it and then whatever settings for the water volume and fog take effect. In addition, this Sprite wavy water can only be cube. It can pass through geometry but it can't be fitted into a non square, like a round liquid container
The flat textured water uses the assigned texture but you must turn off sprites in wave properties and lays it flat on the surface with no rendered waves. But you can set the surface to PAN the textures to emulate a flow, great for green slime and/or flowing LAVA. This method also textures the sides of your volume with the chosen liquid. The advantage, in an aquarium situation, you would see the side of the water volume.
It is very important that if you decide to move or resize this water, you select both the brush and the water object first, using the NODES TAB. If you only move the brush it will cause an error during processing.
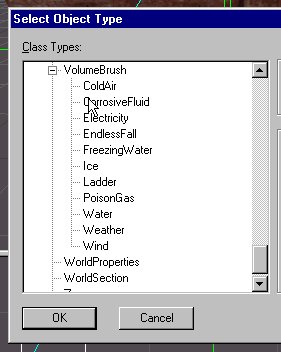
All the volume options. .

If you look into the volume objects folder you'll see many additional potential volumes that get created the same away, these are specific volumes that have already been tweaked for those purposes. Most these volumes cause DAMAGE to the player and or AI if they make contact with it. The Ladder volume as already been discussed in the Stairs, Lifts & Ramps tutorial.
Weather is a special type of Volume.
It also creates visible particles that fall vertically. It can prove very useful and produce great results. The two options are rain and snow. Set it up the same way as you would a water brush. Make sure that the bottom of the weather brush is flush with the ground of your level.
MAKE SURE that these volume brushes DO NOT intersect with the exterior shell of your level, because it can cause a leak.
Let's try something interesting with water.
Most GAMERS enjoy a room getting filled with water, and either emptying or filling up. This can easily get done, using a standard door object. The true power of the door object is the attachment field. You can use a 16x16x16 invisible, non-solid brush and bind it to a DOOR object. Then in the attachment field add your water volume name. This example would be how to raise or lower a pool of water. Of course the move direction, and the move amount and speed would greatly influence the look of the effect. But it does work.
