Sky portals tell the engine where to draw the sky.
SKIES GIVE your level a sense of space and PLACE. You use sky portals to tell the engine where to show sky in your level, and USE SKY BOXES to define what the sky looks like.
First thing you do is select the BRUSH that is the roof of your level. These portals will tell the engine where to draw the sky.
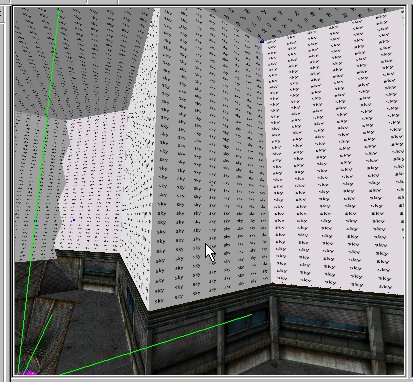
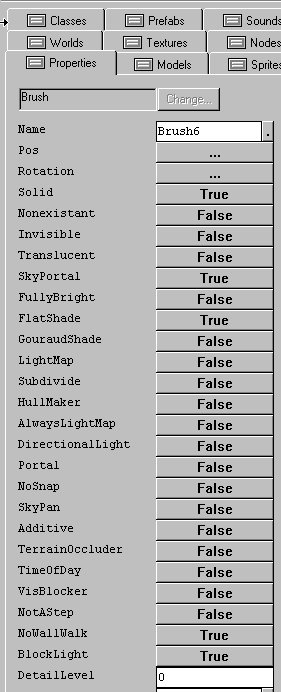
We'll start with a simple replacement, but you can just as easily select all the walls and even the floor and make it a skyPORTAL. There is a special TEXTURE in the WORLDTEXTURES FOLDER called SKY. Select the brush and use ctrl-T to texture the brush. You should have a White texture with the word SKY appearing repeatedly. The texture you pick actually doesn't matter, but if you use the sky texture for the skyportal, it makes it easier to keep track of your brushes. NOW go to the properties menu, and you want to flag ;
SKYPORTAL =TRUE.
And the standards when a brush is created:
1.Gouraud Shade = FALSE,
2.LIGHT MAP = FALSE,
3.SUBDIVIDE = FALSE
Go to WORLD and process the level, then run. If you look at the ceiling you should see blackness. Which is what is outside your level.
Return to the Dedit map editor. There are some basic skies in the PREFAB\SKIES folder. Choose one. Then move you cursor sufficiently away from the outside of your level. Use the floorplan TOP view and move the cursor below and to the left of the level. It's imperative that the sky box not come in contact with the actual level, or be seen through the sky portal, keep it low down below the horizon, or at least the architecture. Double click on the prefab sky. A Square collection of 6 brushes should now be outside your level.

Process and Run the level again. Now there should be a sky when you look up at the ceiling. What you see depends entirely on the SKYBOX that is outside your level. These SKYBOXES have different complexities, so try them out and choose the one that is appropriate for the situation.
Now if you want to create a SKYBOX from scratch, I might get to a complete explanation at some point. Though you can easily change the textures on the BOX and then change the look.

You can also place World geometry into the sky box, though you will need what is called a SKY POINTER for each of these. You can deconstruct the complex_SKY prefab from the tools if you are at all interested.
You might want to add a STATIC SUNLIGHT OBJECT to your map. It basically gives the illusion of a bright sunny day or Strong moonlight, depending on the settings. It's imperative that you process with SHADOWS to see the effect of this STATIC SUNLIGHT OBJECT.
It doesn't matter where you place the Sunlight Object, cause its vector of sunshine light is a function of the rotation in the properties field and not where it is placed, it will shine a light as if it is an infinite distance away. Nonetheless move the cursor somewhere near the top of your map, if you always place it in the same place, you'll know where to go look for it. RIGHT CLICK, then ADD OBJECT, then select STATIC SUNLIGHT.
You have to open up the properties tab for this object and adjust the pitch and YAW, to define from where the sunlight shines. It's trial and error. The default set up is horizontal, so you should try to make it coming from above. USE PITCH, at 45 degrees to start.
How about deep space?
Well luckily, Monolith has provided us with a great deep space matte in the Vehicles.ed file. You can use it as a sky prefab simply by changing the textures on the skybox. Sky boxes have many components. Each one has SKYPOINTER referencing it. It's probably more intense than necessary at this point. We'll have to revisit skyboxes at a later tutorial.