Shortcuts make quick, efficient work of the mundane.
These are the most common shortcuts.
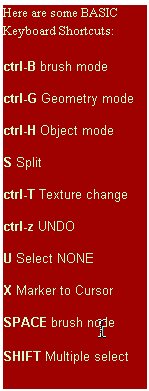
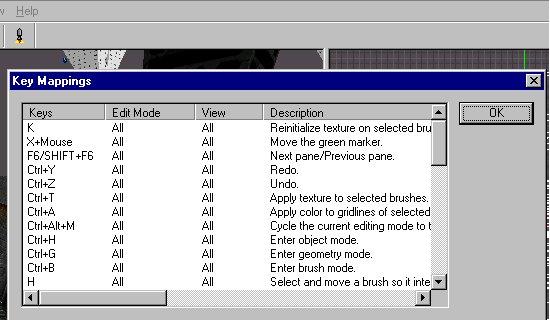
Dedit offers a whole list of them under the help menu. Some truly amazing things can be accessed with the correct keyboard commands. Let's have a brief look at the most advantageous.
"U" select none, invaluable in most modes.
"X" moves the green triple marker to the mouse cursor. Used constantly.
"J" joins faces of Brushes, and ctrl-J unjoins these faces. (Don't try this at home kids, it'll wreak havoc in your maps unless you understand how nosnap works. Find out in the _nosnapnocsg tutorials later).
"F" is similar, it flips a poly face. It will confuse the hell out of you unless you take the time to understand complex Brush construction. Definitely advanced stuff.
"Shift" You can select multiple brushes in Brush mode and select multiple objects in Object mode. Very useful when you're grouping selections to make your node tree neat.
"W" Isn't even listed here, but it is particularly cool, helping to extrude bevels. There's more information back in the Dedit Basic Tutorial near the beggining, as well as a WindowsMedia Video showcasing some of these feature in action. If you skipped it the first time, you might want to consider giving it another look. There's some additional info at the bottom of the page, but should be used after you've study advanced mapping techniques.
Under the help Menu you can check these out in Dedit. Literally just open up a new world and give them a try. Find the ones that work best for you. Usually a combination of menu commands and keyboard shortcuts is the best efficient way to map. Find your own fit.
The decision to use shortcuts is your own mapping style, the good thing is Monolith developed the tools with multiple options regarding level building, you can accomplish the same tasks using menu commends, or the toolbar, or the shortcuts. In addition, situation specific menus pop up regularly with the right click of the mouse. Deciphering which is best for you, is your own personal style.
40-100 hours just to get a grasp on these tools?
I've said this before, but now you might actually believe me. These are state of the art game creation software, and it's a professional job description to be truly functional with them. Most people approach this as a hobby and it'll take a few sleepless nights to achieve anything substantial with them. And if you just create a DM level when all is said and done, it is still an accomplishment. But I guarantee if you decide to stick with it, Dedit offers some of the best functionality in game creation.
Task oriented, goal driven learning, is the best way to tackle map making. Give yourself a project and learn as you go. That's why the tutorials are broken up into many smaller chunks. It makes it easier to find what you need.
MOVING AROUND THE WORK AREA
These are courtesy of NEROTROBE
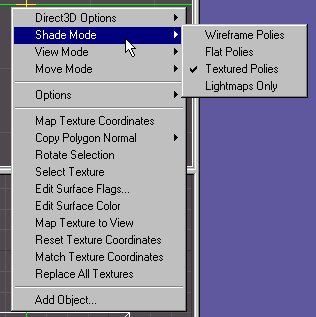
1) Right-click in the 3D preview window and select "Shade Mode > Flat Polies." You won't have any textures now, which looks terrible, but it speeds the rendering up tremendously.
2) Pull in the draw distance by positioning the mouse pointer over the 3D preview window, holding the C key, and moving the mouse down. Moving the mouse up pushes the draw distance back out.
3) You can store positions around the level and hop through them quickly by using the commands in the "Navigator" menu. Or you can select the thing you want to see in the node view and use the toolbar buttons to center the view there, as has already been mentioned.
If you're having trouble moving around because the level has become complex you can lower the mipmap level as described. Here are the camera control keys if you're not familiar with them.
4) Select "View > Debug Window" from the Dedit menus. A little console window appears. Enter "mipmapoffset #;freetextures" in the command line, where "#" is an integer from 0 to 3. The higher the number, the lower resolution textures will be used--going back to 0 sets it back to the default highest resolution. Setting it low (3) can speed up your rendering a good deal.
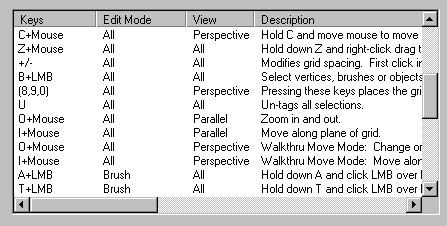
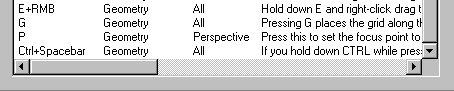
O = Free Look, In the perspective window hold the "O" key and move the mouse around to look around. Holding the "O" key in the 2D windows and moving the mouse up/down will zoom in and out.
O+RightMouseButton = Move backwards, In the perspective window holding these two keys moves the camera backwards, you can continue freelook to manuever the camera.
O+LeftMouseButton = Move forwards, In the perspective window holding these two keys moves the camera forward, you can countinue freelook to manuever the camera.
I = Slide Camera, In the perspective window hold down the "I" key and then move the mouse forwards, backwards, left and right. This works the same way in all four view windows.
I+RightMouseButton = Change Camera Elevation, In the perspective window hold down these two keys and move the mouse up/down to increase or decrease the camera elevation.
I+LeftMouseButton = Fast Slide Camera, same as just holding down the "I" key but faster.
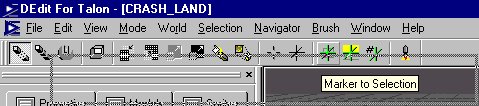
You can move the perspective window camera anywhere in the map and center the views on that location by hitting the "X" key to move the marker to that location in at least two views, and then hitting the "center view" toolbar button. If you leave your mouse cursor over a toolbar button long enough a small tool tip will pop up labeling the button.

There are several toolbar buttons that located the camera to the world marker, the marker to the camera, the marker to the selected object, ect. Experiment with them to get used to them.
Also there is the Navigator menu option. You can store locations in the map by placing the camera there and then going to Navigator-->Store Position. The default name of the position will be its world coordinates. Once a position is stored you can change its name or go to it at any time by going to Navigator--->Organize Positions.
SOME ADVANCED SHORTCUTS
Whenever you enter geometry mode you can potentially create CONCAVE BRUSHES, these will be deemed problem brushes by the processors and will generate errors. This will require you to set these brushes to NOSNAP=TRUE, and will need to bind these to a TWM or process using -nosnapnocsg. Use this with care, if you are just learning, get a handle on the simple stuff first, cause this can confuse you. You can always come back to it later,
Alf_Life offered these tips on the forum,
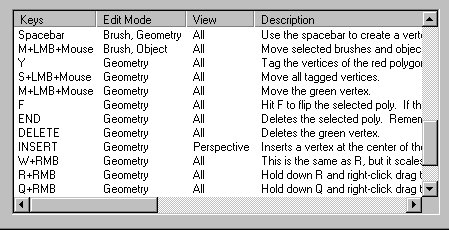
-Holding shift and rightclicking, then moving the mouse just relocates/moves the vertices along the normal.
-Holding W and moving the mouse bevels the face by creating extra vertices.
-Holding W and holding down right-click, while moving the mouse actually extrudes [along the normal], so if you extrude once, stop, then extrude again, you'll get two polies/faces.
-Mixing usage of holding W and moving, and then holding right-click down bevels.
You can then bevel inwards for pillars or stalactites, or outwards for tops of buildings or platforms.
All this needs to be on a face in Geometry mode, and preferrably on a polygon rather than a brush. Also you may want to hold W and move the mouse inward first until you get the hang of extrusion and bevelling; so hold W, drag in, stop. Select the smaller face now created inside, and hold shift and right click and drag up, or hold W, RMButton and drag up.