Lighting takes awhile to achieve a realistic effect.
You should start with a Basic light like we had added to the Basic Dedit level in Your First Level. Open up a level and, then add object, and scroll through the available objects till you find LIGHT. Select it.
A light object will be placed at the triple marker. Now go to the properties tab and select. You will notice that the default radius for the light object is around 300 world units. Change it to 1000. You'll quickly get the hang of what intensity of light you need simply by watching the results. Very important in the development of a light scheme, is giving your light a source, either represented as a texture or as a fixture. Lights that seem to come out of nowhere knocks the player's suspension of disbelief.
Most light in game levels have multiple objects to create the illusion of a full light distribution.
Lights are really a collection of 5-7 objects. Most lights require a decent texture, a nice fixture, at least two regular lights, at least one dirlight, perhaps a scalesprite and a TWM liteFX.
There is a complex collection of objects used to create a realistic light.
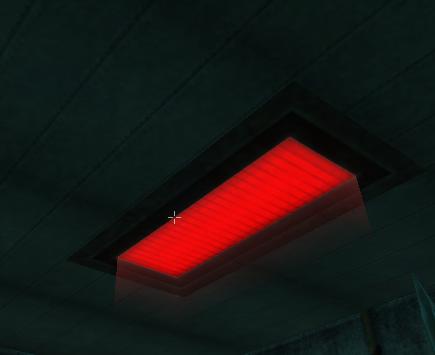
Here is a Light Prefab. As you can see it has multiple elements. You have the fixture brush, you have the hazy shaft of light, and you have the actual light that make the space brighter. I've also added the node tree container expanded so you can see the various components.

Two dirLight casts a directional light out into the room itself, the wider one has less intensity than the first, but it gives a gentle balance that looks more realistic. The actual ordinary light has a radius to light the actual fixture brush so it look like it is lit. (In addition, the actual texutred light brush can be set to FULLYBRIGHT to get a texture light, though that is not the situation here). And finally the TWM is bound to a LITEFX textured brush set to TRANSLUSCENT=TRUE to give off the hazy shaft.
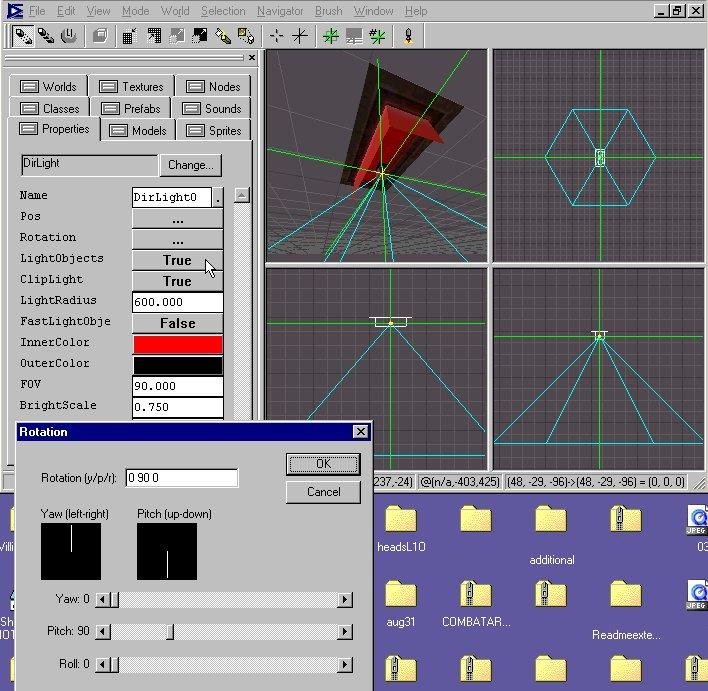
Note that the Dirlights have been rotated by 90 degrees pitch to point downwards, they default horizontal, so pay attention to this if you try to create these lamps.
Unfortunately AvP2 never set up a PREFABS list like Nolf did, but...
There are plenty of Prefab light available in the SAMPLE MAPS
So if you want to select the light from the map, you have to select them all, by holding down the shift key while selecting them in both Brush mode and Object mode. Or you select one of the brushes for the light, then go to the node tree and usually on professional maps they're grouped together in a folder. You just select the parent folder and copy paste where you need it.
Extremely Important, Lights must reflect off World Geometry to be seen.
Most of the time, all a dirlight does is put a circle of light on the ground or wash a wall with a cone effect. Both a regular light and a dirlight have to reflect off world geometry.
If you want it to create the illusion of a lightrays effect through the air or fog, you have to add an extra transluscentWorldModel (use a pyramid) with a litefx texture (details folder), and set to solid=false.
A good example to have a look at are the garage lights in the sample Alien level. You'll notice that there is a four sided light blue box bound to a transluscentWorldModel. That casts the aura rays of the light. If you mix and match them some amazing effects can be created.
Lighting is probably one of those things that make a map look professional. Always try to give your light a real world feel to them, with an identifiable source. Those arbitrary light placementswhere light simply shines, triggers an unconscious response that null our suspension of disbelief.
As part of this, how you set the brushes to react with the ligh will effect the results you get.

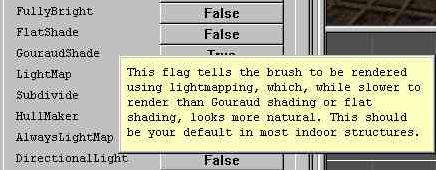
Lightmaps are the best looking lights setting. But understand that light maps add to your overall poly count. For example you could not set an entire landscape to LIGHTMAPS=TRUE. it would generate an error in processing. YOu should instead set Terrain brushes to DIRRECTIONALLIGHT=TRUE only. Flat shade can also be used in certain situations.
Its a process of learning. These are the basics, but since mapping is an artform, you must develop your own particular style.
A variety of lighting or general consistency. A question of colors.
I try to make my maps realistic. Coming from a background in cinematography, I tend to light my levels like a movie set, just enhanced realism. I work with natural blues and tungsten, and add gold hues and reds as necessary. If you're into the rich vibrant colors of the high contrasting Quake type lighting then Lithtech can do it. It really is a personal choice.
Ambient Light plays a role in the lighting scheme as well.We learned about it in the first level we created. It is under the worlds menu\world info. Since ambient light can change the color of an entire level (think the red in Lucifer's Fate) don't forget it in your light planning.

The Static Sunlight Object is basically an adsurdly big light, an infinite distance away from your level that acts as sunlight, or moonlight. We'll touch on it again when we discuss Skyboxes and Portals, but using this static sunlight object to light your levels is very powerful.
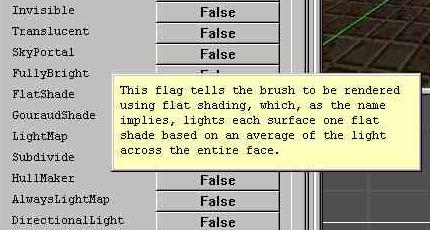
Lighting has many components to it. I need to mention the actual brushes that will be lit by these lights. By default, when a brush is created it had Lightmaps and Subdivide set to true. You can change the effect on these brushes by changing these settings. You can set a brush to FULLYBRIGHT, or to flat shade, or Gouraud shading for trim and railings. The advantages are sometime framrates and just as often an artistic choice for an effect. So lights are more that just the objects, they are also the brushes that interact with them.
There is one other type of Light. It is an OBJECT LIGHT primarily used to light player models and models in dark areas. I might add some information on them at a later date.