Building complex brushes is the future of mapping with Dedit.
All NOLF 2 maps are built this way. Most architectural elements are built in 3DMax and imported as .lta, singleside geometry.
There are two methods of building these brushes in DEdit, and a few method of building this type of brush useing a 3D package such as SoftImage, 3DSMax or Lightwave In DEdit you can either build zero thickness brushes in geometry mode and then use the join function (J) to join them back into concave brushes, of build brushes in regular build mode and then use the unjoin function (CTRL+J) to unjoing them, then remove the faces that you can't see and then rejoin the remaining faces. (sometimes it's easist to join the faces you want to keep, hide them and the delete the remaining brushes) You must then set them to Detail Level 1, NoSnap=True and either bind them to a TranslucentWorldModel or use -nosnapnocsg in the processor options. These complex brushes can't block visibility or be shell brushes, and thus you have to build an invisible shell behind them.
That's where -nosnapnocsg starts. It is a completely different and potentially confusing method of building but if mastered this is the best way to build a level. But you must understand basic level building first, or else it will all just be a jumble of terms and you will be confused.
2 options for Detail brushes
We looked that this briefly near the beginning of these tutorials, and we are revisiting it now. Is a brush a detail brush, or not.
Detail 0 brushes should only compose the SIMPLE OUTER SHELL of your level or be used to block visibility to another area of your level. If you created a map entirely of detail 0 brushes, it would be a series of rooms, corridors, skyportals. At this point, there would be no detail.
Any detail placed inside this shell would be considered detail brushes. They would be set Detail 1. This would be column, posts, furniture, doors windows, frames, crates. So far so good.
This applies to standard build as well.
NOW we want to consider -nosnapnocsg and will use single sided geometry. This will be the actual walls of our level that is seen by the player, but it is not the outshell that seals the level. The outser shell that seals the level will be a very simple, Invisble texuted, Detail 0 box that follows the architecture of the level but is not seen.
What is seen is the heavily detailed, fully textured and rendered detail 1 brushes.
Why do we do this. The processor has to calculate the visibility set from every point in the map that the player may pass. Detail 1 brushes are ignored in this calculation. The engine (not the player) can see through these detail 1 brushes.
So what we do is keep the vis bsp as simple as possible.
What's with these wierd pictures? Single side polies have no back. They have no depth. They have a texture on one side, and on the otherside it is seethrough. Thats what makes them so efficient. Most brushes have a standard 6 sides. This is definitely advanced mapping stick with the basics till your ready to venture into this.
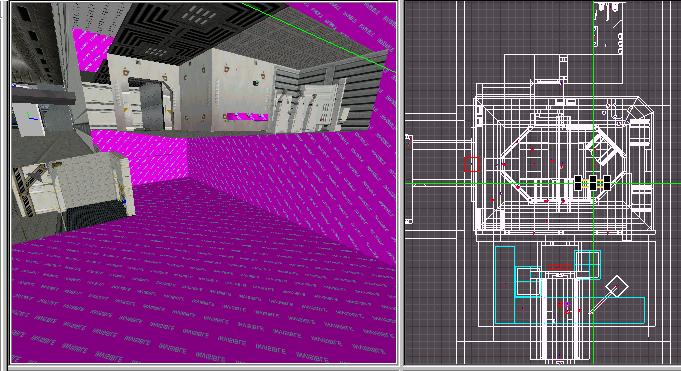
The invisible outershell still follows the geometry of the level , IT IS NOT JUST A BIG BOX around the level. The corridors turn around corners and still block visibility to other areas.
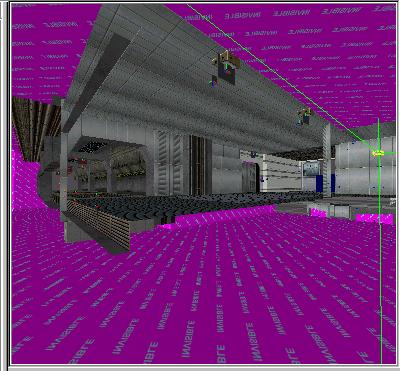
Detail 1 brushes in this particular case is the entire hallway, the light fixtures and the columns.
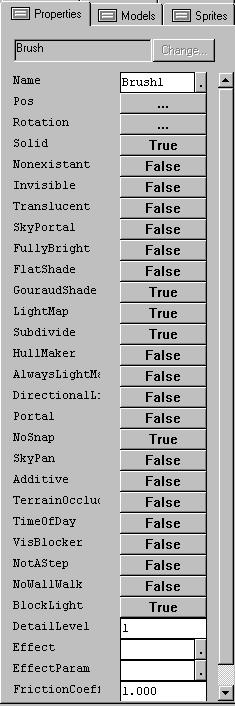
The Detail 0 brushes are the invisible outershell. These brushes are set with these flags.
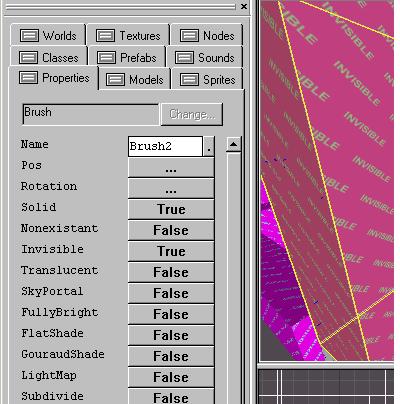
**Note: the standard brush setting for lights are all set false. This brush is invisible it does not have to be lightmapped. Some people might say it doesn't matter since you set invisible=TRUE. perhaps, but its a good habit to get into, and leaves nothing to processing chance.
Some may think this is a way too complicated way to build with the two levels; but since the invisible detail 0 are completely hidden by the visible detail 1, it turns out to be very efficient. And is now my prefered method of build.
What is important is that the OUTERSHELL of your level be kept as simple as possible. These brushes retain their physics properties and they block visibility even though they are invisible. By blocking visibility, I mean that if you are in a room, and look at this brush, the engine will not draw what is beyond, when the level is processed with FULL OPTIMIZATION. With FAST APPROXIMIZATION ( which is an intermediate step) you would be able to see what is beyond the wall.
The interior Detail 1 brushes of your level are what the player actually sees in game, and they can be as detailed as you might want, with the understanding that there is a limit of around 900-1100 polies in any one view to guarantee decent framerates on a minimum requirements computer system.
SAMPLE MAPS
If you look at the SAMPLE_ALIEN and SAMPLE_MARINE you will notice this build style as well. NEROTROBE is a master of -nosnapnocsg and his information through posts in the forum and through discussions played an important part in fleshing out this technique for the modding community. The sample level tended to keep the floor of the level detail 0, but as you can see in my examples, both myself and RedRiot, tend to set the floor to Detail 1 as well. Coty's RETURN TO STRANDED, RedRiot's DM_JUNGLE, and modmaker's CMO_FULLCOMPLEX are all -nosnapnocsg maps.
We've all decided to make maps this way, because maps made using this method, have quicker process times, and better frame rate. The processor draws less, cause you as the mapper have removed it, and processor doesn't have to waste precious processing time, figuring out what to draw for the player, cause its all considerably simpler.
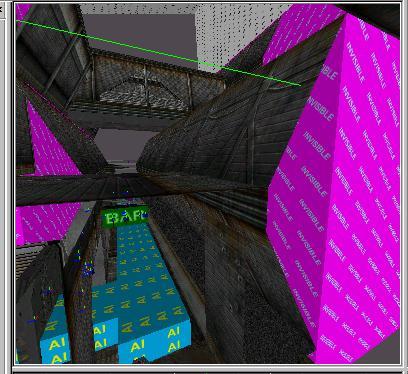
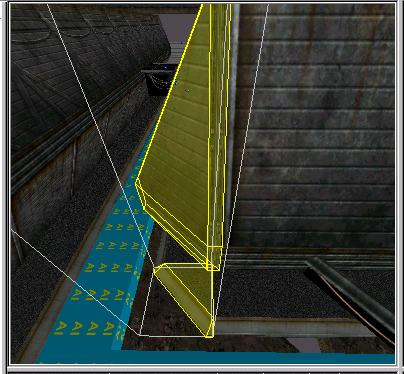
Now this applies for all building, both indoors and out. This here is Nerotrobe's classic AvP2 architecture. He built the standard WeyLand Yutani Hexagonal architecture using -nosnap techniques. Simple invisible brushes set to detail 0 define the OUTERSHELL of this alleyway and the Angled architecture that is more complex is set to Detail 1, and ignored in the visibilty calculations. One thing to note is the just flush on the grid contact. This contact could potentially cause a problem, with mappers that are not meticulous and pay close attention to details. As you may have noticed in the images above, the distance from the OUTERSHELL is considerably more in my examples, its a personal choice. I haven't seen a marked difference in performance if they are butt up tight to the invisible shells, though they may increase you light data a bit.
A GENERAL RULE:
(RedRiot) Objects bound to TranslucentWorldModels, Doors, windows, and other objects, should be set to DETAIL 0 so that you do not encounter overlap problems during processing. If you set these brushes to detail 1, it is possiblethat the processor will note a leak when using -nosnapnocsg.
So in general set these BINDTOOBJECT brushes to detail 0 unless you really know what you're doing. objects that are bound and detail 0 still act like detail 1s, but they don't have the potential to cause as many problems as a detail 1 typically would when using -nosnapnocsg.
You can not have a detail 1 brush making contact with or lying flush to a detail 0 brush while using -nosnapnocsg construction. It can generate an error. Understand this, a detail 1 face lying flush to a detail 0 brush will generate a leak. That detail 1 crate you just put flush on the floor which is detail 0 will will show a leak when you run the leakfile. Remove that face. Here's a good reason for making the floor detail1 as well. This is also important for AIVolumes. AIVolumes that intersect with a Detail0 floor can generate a leak as well. Hence the reason I started making the floors detail 1 as well, and completely enclosing the detail 1 architecture with a invisible detail 0 shell.
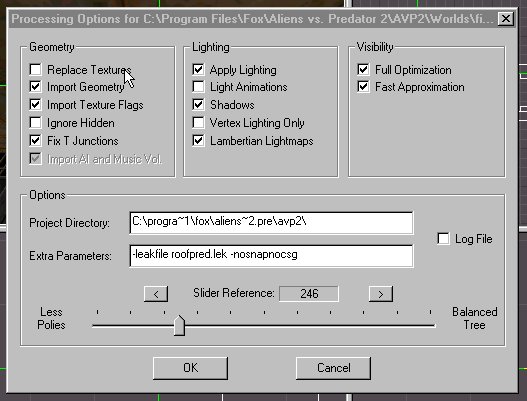
You type, -NOSNAPNOCSG into the extra parameters field on the processor pop up when you are ready to process your map.
What are the benefits?
First off you get better framerates. This is simply a more hands on approch to mapping, and you as the mapper is deciding what will be seen by the player, and not leaving it to the processor to figure it out. You are simply not leaving anything to chance and only leaving in the level the polies that are actually seen. Less polies, means less overdraw, which means a more efficient level. And as a result, this more organized approach also means your level is more organized and bablanced.
This more efficient level also processes quicker, cause the processor doesn' have to calculate which polies to keep and which ones to remove, you have done the work for it.
And a corrollary to the two above, the file size for the levels tend to be smaller, or at least they have more detail packed into every Kb of disk space and file size.
And Two,
You can make make more complex and concave brushes. Nosnap allows you make complex constructions and "join" them together.
This is a NEROTROBE classic Weyland Corner. The tell tale sign is the thin welds on the side. Whenever you see one of these you know the mapper borrowed it from the Monolith supplied Sample maps(snacklab and terraform come to mind for borrowing alot) Actually building this from scratch requires a bit of thinking and conceptual rotations. I know, cause I built them for my custom map Breakdown minus the welds.
If this brush was not set to nosnap with would generate an problem brush error in the processor. This is a complex single sided brush. It has multiple faces that was created by building geometry using the primitives we are already familiar with and creating the intended look.
Then, the group of brushes are literally unjoined using ctrl-J. this separates each individual face from the rest for the brush. Then quite literally using SHIFT, we multiselect the brushes that will be seen, leaving the others ones for a moment.
Once selected, you hit J , this joines these brushes into a new single brush. Make sure you set the properties nosnap=TRUE and Detail 1 in the properties tab. The left over brushes are then deleted. never to be thought of again, and more importantly never proecessed.
Another example sort of related to what we discussed above.
In case you are having a problem grasping this potential intersecting or lying flush problem. Think of a CRATE on the floor. The bottom face will never be seen by the player, and will not be removed by the processor in (nosnapnocsg), that means the engine will be forced to draw it and calculate physics for it. For no reason. Remove it and its not there. Select the Crate brush, hit ctrl-J,(say unjoin in you head) and then select the bottom facing poly. delete it. select the 5 remaining faces. hit J (say join in your head) this joins them. make sure they are set to nosnap=true and detail1 true.
SINGLE SIDE GEOMETRY
If you have previous experience with 3D mapping, it shouldn't be too difficult, to incorporate what you have already learned and adapt them to these tools. The following is a post from NEROTROBE in his own words.
This is where things get complicated, everything past this point is not for beginners. Here are some things you can do with individual faces. You can flip normals by hitting the "F" key, but you will have to do some stuff before you can use a brush with it's normals flipped.
First, the brush can't be a shell brush. (it can't be a brush that is sealing the world to prevent a leak.) Second, select the brush and put "1" in the Detail field in the properties, while we are in here set the "NoSnap" flag to "TRUE"
Finally, make sure only this brush with the flipped normals is selected and hit "CTRL+J" this will unjoin the brushes into six single sided brushes.
You should now delete any faces of this brush that aren't seen, since the detail 1 field makes the processor not remove back facing polys on these brushes. In case you are having a problem grasping this.
If you want at this point you can then select any remaining faces and rejoin them back to a brush by hitting "J" with them selected. Make sure you don't have any other brushes selected first. If this brush doesn' show up correctly in the game you can select it and right click and goto "Bind to Object" select "TranslucentWorldModel" from the list and that should fix the problem.
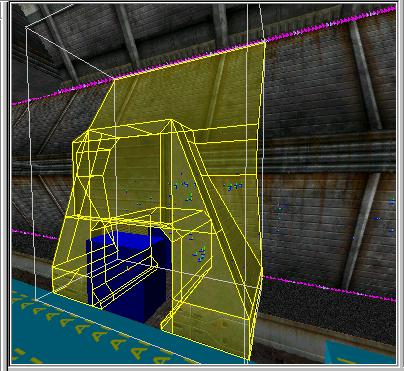
A Weyland Yutani entrance Prefab like this can be placed into a regularly built level, by binding this brush to a TRANSLUSCENT WORLD MODEL.